学习掌握好 nginx,
一、初识 nginx
1.1、安装
以 centos 为例,通过 yum 进行安装
# 安装nginx
yum install nginx -y
# 查看安装的版本
nginx -v
# 查看编译时的参数
nginx -V
1.2、操作
命令
systemctl [option] nginx.server
option
start: 启动stop: 停止status: 状态restart: 重启reload: 重新读取配置
1.3、配置文件
上面安装的 nginx 版本为 nginx/1.20.1,以此为例,nginx 配置文件如下
/etc/nginx/nginx.conf: 主配置文件/etc/nginx/conf.d/*.conf: 包含conf.d目录下面的所有配置文件/etc/nginx/default.d/*.conf: 包含default.d目录下面的所有配置文件
1.3.1、nginx配置语法
主配置文件 /etc/nginx/nginx.conf 配置如下
# 全局配置
user nginx; # user: 设置nginx服务的系统使用用户
worker_processes auto; # 工作进程数,一般和CPU数量相同
error_log /var/log/nginx/error.log; # nginx的错误日志
pid /run/nginx.pid; # nginx服务启动时的pid
# Load dynamic modules. See /usr/share/doc/nginx/README.dynamic.
include /usr/share/nginx/modules/*.conf;
# 事件配置
events {
worker_connections 1024; # 每个进程允许的最大连接数
}
# http 配置
http {
log_format main '$remote_addr - $remote_user [$time_local] "$request" '
'$status $body_bytes_sent "$http_referer" '
'"$http_user_agent" "$http_x_forwarded_for"'; # 日志记录格式
access_log /var/log/nginx/access.log main; # 默认访问日志
sendfile on; # 启动 sendfile
tcp_nopush on; # tcp_nopush: 懒发送
tcp_nodelay on;
keepalive_timeout 65; # 超时时间
types_hash_max_size 4096;
include /etc/nginx/mime.types; # 文件后缀和类型类型的对应关系
default_type application/octet-stream; # 默认content-type
include /etc/nginx/conf.d/*.conf; # 包含的子配置文件
# server 配置
server {
listen 80; # 监听端口
listen [::]:80;
server_name _; # 用域名方式访问的地址
root /usr/share/nginx/html; # 静态文件根目录
location / {
root /usr/share/nginx/html;
index index.html index.htm; # 首页的索引文件
}
error_page 404 /404.html; # 指定错误页面 🙅♂️
location = /404.html {
}
error_page 500 502 503 504 /50x.html; # 把后台错误重定向到静态的50x.html页面
location = /50x.html {
}
}
}
- 配置文件由 指令 与 指令块 组成,指令块以
{}将多条指令组织在一起 - 每条指令以
;(分号) 结尾,指令与参数之间以空格分隔 include语句允许把多个配置文件组合起来以提升可维护性- 一个
http下面可以配置多个server, 一个server下面可以配置多个location
二、nginx 工作流
三、nginx 实战
3.1、静态资源 web 服务
静态资源: 一般客户端发送请求到web服务器,web服务器从内存中取到相应的文件,返回给客户端,客户端解析并渲染显示出来
CDN: 实时地根据网络流量和各节点的连接、负载状况以及到用户的距离和响应时间等综合信息将用户的请求重新导向离用户最近的服务节点上
配置选项
| 配置项 | 含义 | 可选值 | 默认值 | 上下文 |
|---|---|---|---|---|
sendfile | 不经过用户内核发送文件 | on/off | off | http, server, location, |
tcp_nopush | 在sendfile开启的情况下,合并多个数据包,提高网络包的传输效率 | on/off | off | http, server, location, |
tcp_nodelay | 在keepalive连接下,提高网络包的传输实时性 | on/off | off | http, server, location, |
gzip | 压缩文件可以节约带宽和提高网络传输效率类型 | on/off | off | http, server, location, |
gzip_min_length | 最小压缩文件的大小 | size | http, server, location, | |
gzip_comp_level | 压缩级别, 值越高,压缩的体积越小 | level | 1 | http, server, location, |
gzip_http_version | 压缩版本 | 1.0/1.1 | 1.1 | http, server, location, |
http_gzip-static_module | 先找磁盘上找同名的.gz这个文件是否存在,节约CPU的压缩时间和性能损耗 | on/off | off | http, server, location, |
实战
- 资源
mkdir -p /data/www/images
mkdir -p /data/www/html
echo color > /data/www/html/color.html
gzip /data/www/html/color.html
mkdir -p /data/www/download
- 配置
location ~ .*\.(jpg|png|gif)$ {
  gzip off;#关闭压缩
  root /data/www/images;
}

location ~ .*\.(html|js|css)$ {
  gzip_static on;
  gzip on; #启用压缩
  gzip_min_length 1k;    #只压缩超过1K的文件
  gzip_http_version 1.1; #启用gzip压缩所需的HTTP最低版本
  gzip_comp_level 9;     #压缩级别,压缩比率越高文件被压缩的体积越小
  gzip_types  text/css application/javascript;#进行压缩的文件类型
  root /data/www/html;
}

location ~ ^/download {
  gzip_static on; #启用压缩
  tcp_nopush on;  # 不要着急发,攒一波再发
  root /data/www; # 注意此处目录是`/data/www`而不是`/data/www/download`
}
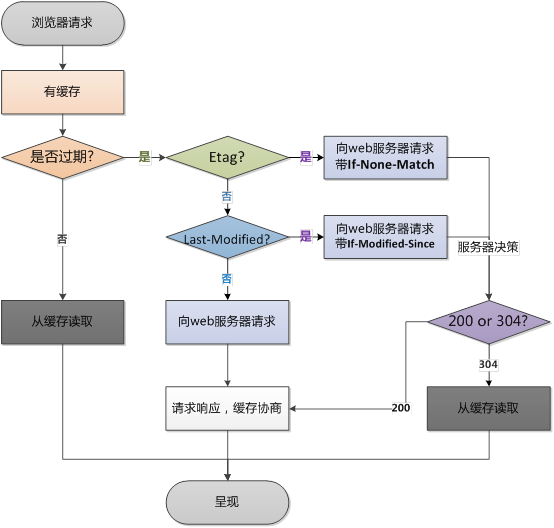
3.2、浏览器缓存
浏览器校验本地缓存流程

可设置的响应头
- Expires
- Cache-Control
- Etag
- Last-Modified
设置 Expires
location ~ .*\.(jpg|png|gif)$ {
    expires 24h;
}
3.3、跨域
关于什么是跨域,以及汇总的解决办法,请参考 一文汇总9种跨域方法,在 nginx 中解决跨域,需要设置不同的响应头
语法
add_header name value
客户端
在客户端通过 live-server 开启本地服务,向服务端发送请求
<!DOCTYPE HTML PUBLIC "-//W3C//DTD HTML 4.0 Transitional//EN">
<html>
  <head>
  </head>
  <body>
    <script>
      let xhr = new XMLHttpRequest();
        xhr.open('GET', 'http://{ip}/user.json', true);
        xhr.onreadystatechange = function () {
            if (xhr.readyState == 4 && xhr.status == 200) {
                console.log(xhr.responseText);
            }
        }
      xhr.send();
    </script>
  </body>
</html>
服务端
- 静态资源
mkdir -p /data/json
cd /data/json
vi user.json
{"name":"前端壹甲壹"}
- nginx 配置
location ~ .*\.json$ {
  add_header Access-Control-Allow-Origin http://127.0.0.1:8080;
  add_header Access-Control-Allow-Methods GET,POST,PUT,DELETE,OPTIONS;
  root /data/json;
}
3.4、代理
通过在 server 或 location 中设置 proxy_pass 来实现代理
3.4.1、正向代理
正向代理的对象是客户端,服务器端看不到真正的客户端,例如翻墙使用的VPN
3.4.2、反向代理
反向代理的对象的服务端,客户端看不到真正的服务端,例如 nginx 代理的应用服务器
location ~ ^/api {
    proxy_pass http://localhost:3000;
    proxy_redirect default; #重定向

    proxy_set_header Host $http_host;        #向后传递头信息
    proxy_set_header X-Real-IP $remote_addr; #把真实IP传给应用服务器

    proxy_connect_timeout 30;  #默认超时时间
    proxy_send_timeout 60;    # 发送超时
    proxy_read_timeout 60;    # 读取超时
}
proxy_pass
proxy_pass后的url最后加上/就是绝对根路径,location中匹配的路径部分不走代理,也就是说会被替换掉
location /a/ {
    proxy_pass http://127.0.0.1/b/;
}
# 请求 http://example.com/a/test.html, 会被代理到 http://127.0.0.1/b/test.html
proxy_pass后的url最后没有/就是相对路径,location中匹配的路径部分会走代理,也就是说会保留
location /a/ {
    proxy_pass http://127.0.0.1;
}
# 请求 http://example.com/a/test.html, 会被代理到 http://127.0.0.1/a/test.html
(PS: 为了方便记忆和规范配置,建议所有的 proxy_pass 后的url都以/结尾 )
- 在
proxy_pass前面用了rewrite,如下,这种情况下,proxy_pass是无效的
location /getName/ {
  rewrite    /getName/([^/]+) /users?name=$1 break;
  proxy_pass http://127.0.0.1;
}
3.5、负载均衡
当网站出行高并发,访问量大时,一台服务器的处理能力、存储空间不足时,应该增加一台服务器去分担网站的访问及存储压力。
通过负载均衡调度服务器,将所有的访问请求分发到应用服务器集群中的任何一台服务器上,当有更多的访问,就在集群中加入更多的应用服务器
3.5.1、upstream
通过 upstream 定义一组服务池,nginx 把请求转发到服务池
upstream webServer {
  server 127.0.0.1:3000;
  server 127.0.0.1:4000;
  server 127.0.0.1:5000;
}
3.5.2、后端服务器调试状态
| 状态 | 描述 |
|---|---|
down | 当前服务器不参与负载均衡 |
backup | 当其它节点都无法使用时的备份服务器 |
max_fails | 允许请求失败的次数, 到达最大次数就会休眠 |
fail_timeout | 经过 max_fails 失败后,服务器休眠时间,默认10秒 |
max_conns | 当前服务器可接收的最大连接数 |
upstream webServer {
  server 127.0.0.1:3000 down; #不参与负载均衡
  server 127.0.0.1:4000 backup; #充当备份服务器
  server 127.0.0.1:5000 ;
}
3.5.2、分配方式
| 类型 | 描述 |
|---|---|
| 轮询(默认) | 平均主义, 每个请求按时间顺序逐一分配到不同的后端服务器,当某个服务器down掉,会被自动剔除 |
weight | 加权轮询,通过weight指定轮询几率,weight和访问比率成正比 |
ip_hash | 每个请求按访问ip的hash结果分配, 每个访客固定访问一个后端服务器,可以解决session 的问题 |
least_conn | 哪个机器上连接数少就分发给谁 |
url_hash | 按访问的URL地址来分配 请求,每个URL都定向到同一个后端服务器上(缓存)。(ps: 第三方) |
fair | 按后端服务器的响应时间来分配请求,响应时间短的优先分配。(ps: 第三方) |
# weight
upstream webServer {
  server 127.0.0.1:3000 weight=1;
  server 127.0.0.1:4000 weight=2;
  server 127.0.0.1:5000 weight=4;
}
# ip_hash
upstream webServer {
  ip_hash # [type], type = ip_hash | least_conn | url_hash | fair
  server 127.0.0.1:3000;
}
4、location
location 会用来匹配 URI,但会忽略其中的参数
4.1、正则表达式
| 类型 | 描述 |
|---|---|
. | 匹配除换行符之外的任意字符 |
? | 重复0次或1次 |
+ | 重复1次或更多次 |
* | 重复0次或多次 |
^ | 匹配字符串的开始 |
$ | 匹配字符串的结束 |
{n} | 重复n次 |
{n,} | 重复n次或更多次 |
[abc] | 匹配单个字符a或者b或者c |
a-z | 匹配a-z小写字母的任意一个 |
\ | 转义字符 |
() | 分组,用于匹配括号之间的内容,可以通过$1、$2引用 |
\w | 指包含大 小写字母数字和下划线 相当于([0-9a-zA-Z]) |
4.2、语法规则
- 前缀匹配
- 常规
=, 精确匹配^~, 匹配上后则不再继续进行正则的匹配
- 正则表达式
~, 大小写敏感的正则表达式匹配~*, 忽略大小写敏感的正则表达式匹配
- 内部调转
- 用于内部跳转的命名
location @xxx
- 用于内部跳转的命名
location [=|~|~*|^~] uri {...}

location @name{...}
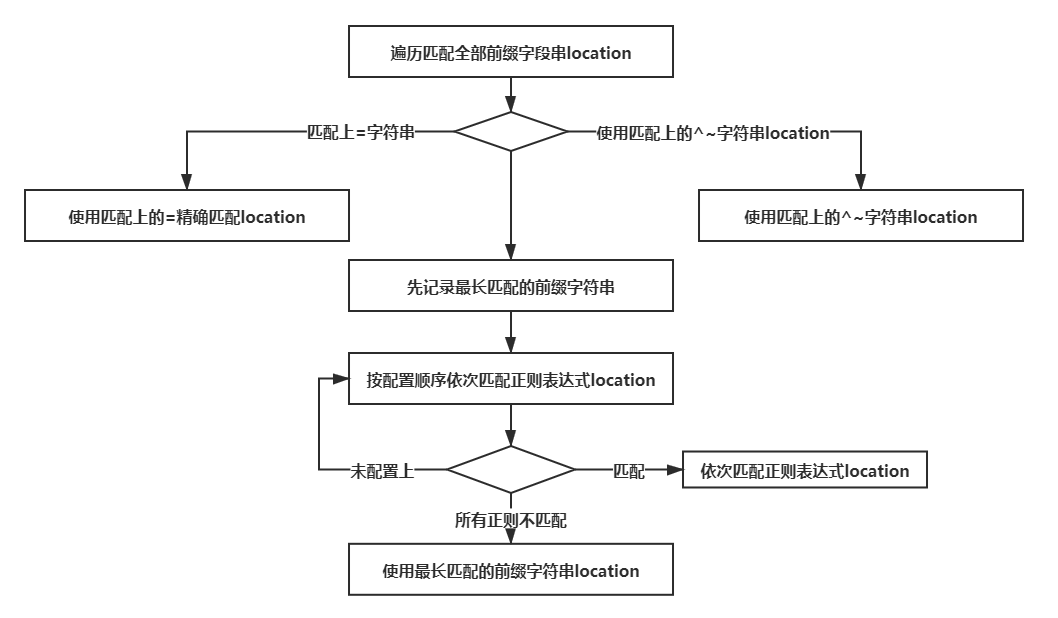
4.3、匹配规则

- 等号类型(=)的优先级最高
- ^~类型表达式的优先级次之
- 反之,则匹配正则表达式类型(~ ~*),如果有多个location的正则能匹配的话,则使用正则表达式最长的那个
- 最后,常规字符串匹配类型按前缀匹配
location ~ /T1/$ {
  return 200 '匹配到第一个正则表达式';
}
location ~* /T1/(\w+)$ {
  return 200 '匹配到最长的正则表达式';
}
location ^~ /T1/ {
  return 200 '停止后续的正则表达式匹配';
}
location  /T1/T2 {
  return 200 '最长的前缀表达式匹配';
}
location  /T1 {
  return 200 '前缀表达式匹配';
}
location = /T1 {
  return 200 '精确匹配';
}
/T1     //精确匹配
/T1/    //停止后续的正则表达式匹配
/T1/T2  //匹配到最长的正则表达式
/T1/T2/ //最长的前缀表达式匹配
/t1/T2  //匹配到最长的正则表达式
5、rewrite
通过 rewrite 实现 url 重写及重定向
语法
rewrite regex replacement [flag]
flag
flag: 标识规则对应的类型
| 类型 | 描述 |
|---|---|
last | 先匹配自己的location,然后通过rewrite规则新建一个请求再次请求服务端 |
break | 先匹配自己的location,然后生命周期会在当前的location结束,不再进行后续的匹配 |
redirect | 返回302昨时重定向,以后还会请求这个服务器 |
permanent | 返回301永久重定向,以后会直接请求永久重定向后的域名 |
location ~ ^/break {
  rewrite ^/break /test break;
  root /data/html;
}

location ~ ^/last {
  rewrite ^/last /test last;
}

location /test {
  default_type application/json;
  return 200 '{"code":0,"msg":"success"}';
}

location ~ ^/redirect {
  rewrite ^/redirect http://www.baidu.com redirect;
}
location ~ ^/permanent {
  rewrite ^/permanent http://www.baidu.com permanent;
}
# curl http://localhost/last
{"code":0,"msg":"success"}

# curl http://localhost/break
test # 并没有继续匹配到 `/test`, 而是直接终止,去 /data/html/ 目录下去匹配 test 目录

# curl -vL http://localhost/redirect

# curl -vL http://localhost/permanent